4.2 KiB
+++ title = "RAID with btrfs" date = 2024-12-30 draft = false
[taxonomies] categories = ["Misc."] tags = ["btrfs", "NAS", "RAID", "RAID10", "RAID1", "RAID0"]
[extra] lang = "en" toc = true comment = true copy = true math = false mermaid = false +++
Introduction
What is RAID?
Shamelessly copying from the relevant Wikipedia page:
RAID (/reɪd/; redundant array of inexpensive disks or redundant array of independent disks) is a data storage virtualization technology that combines multiple physical data storage components into one or more logical units for the purposes of data redundancy, performance improvement, or both.
That definition works well enough in case you don't already know what RAID is, which I doubt is the case for anyone reading this post.
Why use it?
Ever had a hard drive containing important data - without any backups - fail? Or, a little less likely, had a mission-critical file server break for a few hours because a drive failed? These are the two biggest problems that RAID solves.
That's great, but how do I use it?
And finally, we have the main body of this blog post! While frustatingly looking up how to do slightly weird things with RAID using btrfs, I found the lack of documentation annoying - so, I thought I'd make this blog post to aggregate a bunch of commands.
And so, the list:
RAID1
- Setting up RAID1 with two disks:
mkdir /mnt/raid1 # make the RAID1 pool btrfs device add /dev/sdA1 /mnt/raid1 # add the first device btrfs device add /dev/sdB1 /mnt/raid1 # add the second device - Setting up RAID1 when you already have a disk with some data on it and want to add another:
btrfs device add /dev/sdB1 /mnt/raid1 # add the second device
btrfs balance start -dconvert=raid1 -mconvert=raid1 /mnt/raid1 # distribute data to get the array set up
RAID0
- Setting up RAID0 with two disks - exactly the same as with RAID1:
You can also continue to add more devices. The total storage available at the end of the process is the sum of the storage available on each drive:mkdir /mnt/raid1 # make the RAID1 pool btrfs device add /dev/sdA1 /mnt/raid0 # add the first device btrfs device add /dev/sdB1 /mnt/raid0 # add the second devicebtrfs device add /dev/sdC1 /mnt/raid0 # add the third device btrfs device add /dev/sdD1 /mnt/raid0 # add the fourth device # and so on... - Setting up RAID0 when you already have a disk with some data on it and want to add another:
btrfs device add /dev/sdA1 /mnt/raid0 # add the second device
btrfs balance start -dconvert=raid0 /mnt/raid0 # distribute data to get the array set up
Nested RAID levels
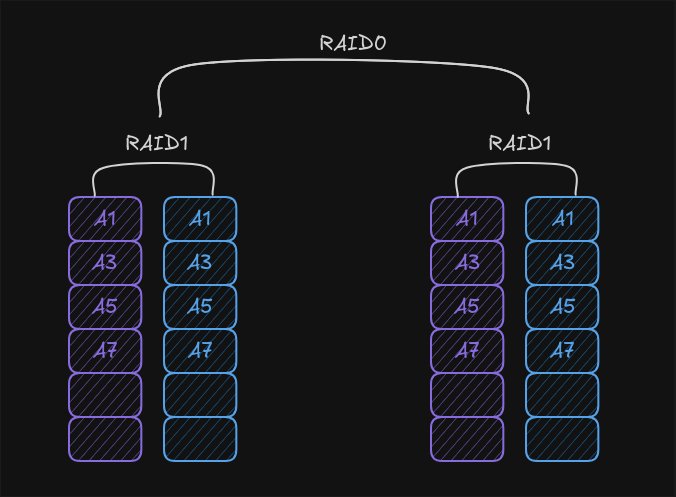
Btrfs also supports RAID10 (or RAID1+0) which is a combination of RAID1 and RAID0 as demonstrated by the following image:

However, as you can see, RAID10 requires n disks where n is an even number greater than or equal to 4. Furthermore, if you tried using devices of varying sizes, space would likely be wasted. So what would you do if you had 3 devices, with, for example, sizes of 1TB, 500GB, and 500GB?
A possible solution here would be to split the 1TB drive into two equal partitions of 500GB, and pass them to btrfs as independant drives.
Theoretically, you could also combine the two 500GB drives into a RAID0 partition and combine them through RAID1 with the 1TB drive (creating a nested RAID01/RAID0+1 array), but this seems to be unsupported by btrfs.
In general, setting up a RAID10 array with btrfs looks like this:
mkdir /mnt/raid10 # make the RAID10 pool
btrfs device add /dev/sdA1 /dev/sdB1 /dev/sdC1 /dev/sdD1 /mnt/raid10 # add the drives
btrfs balance start -dconvert=raid10 -mconvert=raid10 /mnt/raid10 # distribute data to get the array set up
Useful resources
- btrfs disk usage calculator - I found this somewhat useful, but it won't tell you how to get whatever configuration you set up to work
- The Wikipedia page on nested RAID levels